Lync 2013 – Configuration Guide for using JetNEXUS Appliance as Reverse Proxy

Hello

A couple of weeks ago i created a detailed blog about life after TMG and what offerings there are in the way of a reverse proxy for Lync going forward. In that blog posting i mentioned IIS AAR and KEMP as options, but failed to mention JetNEXUS. Sorry JetNexus. !! So for that reason as a small ‘sorry’ ive given headspace to building one of their appliance’s in my lab to use as a RP against Lync 2013.

Also the people in the UK who are unsure on supportability of other vendor appliances I can confirm that JetNEXUS are primary based within UK with their HQ in Buckinghamshire.

Thanks to Gary Christie for supplying me with the license and details needed.

as usual the below is the lowdown on my Lab environment for the blog

DC = Win2008r2, AD level 2008r2

Lync 2013 SE, running on Windows2012

Windows 7, running the Lync 2013 Client

Peripheral devices for testing iphone 5 running IOS7beta5, Windows Phone 8

STEP 1 – creating the Virtual Jet Appliance. For this i, running the HyperV version of the Appliance

In your Hyper-V Manager, client right click on the server and select > Import Virtual Machine

1

Once you’ve selected the import option goto the Folder containing the ALB-X subfolders which in my case is C:\Users\SMITIAI\Downloads\jetNEXUS ALB-X VA\ ****NOTE: if you dont unpack the folder first you wont find the VMs!

next through the screen until you get to the import type screen. At this point Click “Copy the virtual machine (create a new unique ID)”

2

‘Next’ through the rest of the screens until you can select the finish button.

Once your Jet appliance is import select to connect and start the VM

3

STEP 2 – Configuration of IP’s base config

The simplest way to configure the initial install is to use the Jet Discovery software which comes with the appliance. Simply open the .exe and it will find your running appliance (Jdiscover.exe is in the same folder as the VM’s and at the time of writing the version is 3.6.1)

****Just to point out something completely bizarre at this point. On start up of the appliance it automatically selects an IP address from DHCP, which in my case it did find DHCP and subsequently associated itself and IP of xxx.xxx.1.204 which was/is the same IP to which my Lync 2013 SE was/is running on.!!?? odd. for me to get round this i had to down the SE to allow the appliance to finish starting up then i could change the IP on the appliance.. Look out for this little gotcha

Back to running the .exe, as stated it will find the Rp automatically and at this point you can add the necessary changes to the base config

4

once you’ve applied the required settings, right hand click and select connect to webportal

At this point the installation is complete. Next step is the RP configuration

STEP 3 – Setting up the RP as a Lync Reverse Proxy

Navigate to the IP address you specified PLUS the :PORTNUMBER 27376 ie: 192.168.1.223:27376

8

then apply the username and password (default is admin, password is jetnexus)

you will then jump into the jetnexus portal. The first thing im going to do in the portal is to update the password into a more sensible one. to do this you need to navigate to configure, security on the left hand pane

9

now onto further config work. Going to the Setup>appliance on the left hand pane i want to make sure my IP address for the RP is attached to the eth0 port.

10

If you did need to make any changes you just double click into the IP, Subnet etc to amend. Nice feature! (dont forgot to press update)

Im now going to add the default gateway into the RP

11

At this point nothing to taxing has taken place, so onto loading a jetpack. <A jetpack is a prebuilt configuration pack which you can get for Lync Frontend load balancing, Lync edge load balancing (both internal and External), exchange 2010, 2013 load balancing and last of all Lync Reverse Proxy )

Now to add the jet pack to my RP. to do this navigate to advance Software update. Of course you will have needed to created/download a jetpack first!.

I’m going to use the standard Lync RP jetpack then tweak to suit my needs

12

Now onto tweaking the appliance for my Lync environment

back to setup and IP services

13

lets now move onto importing our SSL cert to bind to the RP

to do this you need to navigate to the configure, then SSL

select import and selct your cert.

14

now lets bind the cert to the RP. now back to the setup, Ipservices and then select the actions TAB, then select SSL and use the dropdown to add your cert

15

now back to look and check your connection

16

and Finish

I must say the easiest of all the Reverse Proxy Appliances to set up for Lync. Using the LyncRP template was a breeze. Well done JetNexus, it was a simple setup and one i would recommend in the future.

Regards

Iain Smith

Lync 2013 – Using a KEMP Appliance as a Reverse Proxy – Installation / Configuration Guide

Hello All.

Now with the disappearance of the TMG appliance that we all came to love and loath, there are only a few options out there for using as a reverse proxy for Lync. The few i think  are

  1. Windows Server using IIS AAR for Proxy’ing
  2. KEMP Appliance / Virtual Machine
  3. Citrix Netscaler

For me option 1 isnt an option as i personally think using a Windows Server then bending it to be a RP isnt viable and one i wouldn’t suggest to my clients. Option 3 is only a option if you have a citrix netscaler going spare. Again i wouldn’t be rushing out to buy a Citrix Netscaler if i had other options.

That leaves the second option which is my default option for my clients who are looking to purchase a RP. You heard it hear first KEMP will become the default mantra of Reverse Proxy for Lync going forward.

In this blog post Im going to detail how you go about setting up a KEMP Applicance as a reverse Proxy. (Note: The setup is the same for the Kemp Range, but today within this guide i will be using a KEMP VLM100)

To start with you need information from your Lync environment around the external Web services. ie: Name etc. For me, my labs external web service is called LyncWebExt.northernlync.co.uk.

Also i will be requiring a public certificate for the KEMP appliance. There are many public authorities out there which can provide this. <At the time of writing GoDaddy are the most competitive in pricing for UCC Certificates) NOTE: If you have a wildcard certificate this can be used on the RP as well.

If you need information on how to create the certificate request follow the link > http://technet.microsoft.com/en-us/library/gg429704.aspx

***Please be sure your public cert has the following on it.

Subject Name / Common Name = <Your Lync External Web name> – LyncWebExt.northernlync.co.uk in my case

SAN Name = <Your Lync External Web name> – e.g. LyncWebExt.northernlync.co.uk in my case YES Put it in as a SAN as well!!!

SAN Name = <Your Lync ‘meet’ service name – e.g. meet.northernlync.co.uk

SAN Name = <Your Lync ‘dialin’ service name – e.g. dialin.northernlync.co.uk

SAN Name = lyncdiscover.<domain> – e.g. lyncdiscover.northernlync.co.uk

So with our information at hand and our certificate provisioned lets move onto the steps required to setup out Kemp.

ALSO: Typically the KEMP appliance for Lync Reverse Proxy, requires be located within your DMZ and NOT on your internal domain.!

Step 1

The appliance will come with a default IP of 192.168.101.1 .  If your running a virtual KEMP appliance then you will see on the black linux dialog the IP address to which is the node. If you are running a hardware appliance plug an ethernet cable into eth0 on the front of the appliance and navigate to the above IP via a web browser

Once youve select the IP with the browser you will be prompted for a username and password. by default this is

Username = bal

password 1fourall

1

Step 2 – Base Line configuration

Now we are on the console of the appliance lets start making the base line changes around the IP’s, local users and passwords etc.

From the Home screen, select on the left hand side to ‘System Configuration’

2

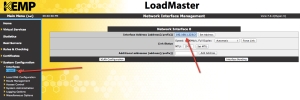
Now select Interfaces, then eth0 and add the IP address to which you will administer the appliance in the future. <for my lab the IP address ive selected is 192.168.1.223/24 (/24 is the subnet range, so tweak this to suit your needs)

3

NOTE: once this is complete the appliance will reset itself onto that IP so be sure you can navigate to it.

Again from the Systems Configuration Menu we are now set give the appliance a name. To do this select local DNS Configuration, then hostname Configuration. Now add the hostname of your choice.

In my lab ive called in KEMPRP1

4

Next we will still using the Local DNS Configuration option – add out local DNS NameServer IP and also the DNS Search Domain name

5

Next we need to select the Route Management Option from the Menu and select default Gateway.

6

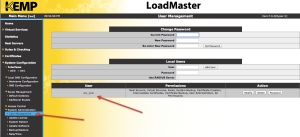
Jumping further down the left pane menu you need to select ‘system Administration’, then the user management option

At this point to can change the password for the bal account AND also create a new account with a new username. <I personally always create a username and password which only i know as a backup to loosing or someone changing the main account password>

7

So that is it for the step2 baseline config.

You can if you feel necessary add Logging Config etc. I wont go into enabling that as its simple and straight forward to setup.

Step 3 – Adding a Virtual Server

so jumping back up the menu tree to the top we are now going to create a virtual server. For understanding the virtual server is the DMZ IP address to which the appliance is listening on. e.g your public IP will come inbound to your Firewall, then the firewall should Nat this through to your DMZ on a natted IP address which will match the virtual server IP of your Kemp Appliance.!.

ok so the first step from selecting the virtual service menu is to select ‘Add New’

You will then be prompted for a Virtual Address, which needs to be the DMZ natted IP address! which for my lab is 192.168.1.228

The port you are attaching to this virtual address is 443 as all traffic bound for the Kemp RP will be routed through 443, Next add a service name as an identifier <LyncMobility>, then the last step the Protocol is TCP.

then click ‘Add this Virtual Service’

8

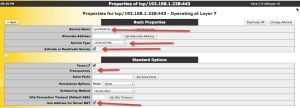
You will then automatically jump to the properties page for the Virtual Machine. This is where you do the main config and server creation.

by default you will have the name you gave the service, the service type of HTTP/HTTPS and activate/deactivate Server <Enabled by Default>

Now select to expand standard options.

Now remove the tick for > Transparency

Add put a tick in the > Use Address for Server Nat

9

Now select to expand the option for SSL Properties

then select the option for SSL Acceleration = Enabled ! NOTE: you will get a warning about no certificate being available for the appliance. just ok this.

Once in the SSL Properties select the reencrypt tick box

now add the public reverse proxy certificate we created earlier by selecting ‘add new’, Also don’t forget to add the intermediate certificate as well

10

— Ignore advanced Properties as nothing needs changing on this.

— If your appliance has the new ESP option, you can ignore this as well

Now select the expand the Real Server Option, and select Add New

111

Now dependant on you default gateway you might be required to select an option in the miscellaneous option under network options to allow you to add a Real Server which is not in the default gateway IP range.

once you placed a tick in the option \> Enable non local Real Servers you will then get an option on the real server creation to bypass the check

Back on the adding of the Real Server, ive ticked the option to add a non local server, then added the IP address of my Lync Frontend, then we need to change the port to be 4443 for the internal routing, then we can select add

11

then select back, once you’ve had acknowledgement of the creation of the real server

last steps now, still on the real server option area select the checked port as 4443 and hit set checked port, then change the HTTP Method from HEAD to GET

12

Thats it. the set up is complete.

Jump back to Virtual Servers and select View. you will see your service as UP and working.

13

can from your Lync Mobile client log in with your user credentials.

ALSO you can see from the Home Screen graph traffic routing through

14

thanks for looking, and i hope it helps some of you out there.

**Special thank you to Bhargav at Kemp for providing my Kemp Licence.!