Lync 2013 – Using a KEMP Appliance as a Reverse Proxy – Installation / Configuration Guide

Hello All.

Now with the disappearance of the TMG appliance that we all came to love and loath, there are only a few options out there for using as a reverse proxy for Lync. The few i think  are

  1. Windows Server using IIS AAR for Proxy’ing
  2. KEMP Appliance / Virtual Machine
  3. Citrix Netscaler

For me option 1 isnt an option as i personally think using a Windows Server then bending it to be a RP isnt viable and one i wouldn’t suggest to my clients. Option 3 is only a option if you have a citrix netscaler going spare. Again i wouldn’t be rushing out to buy a Citrix Netscaler if i had other options.

That leaves the second option which is my default option for my clients who are looking to purchase a RP. You heard it hear first KEMP will become the default mantra of Reverse Proxy for Lync going forward.

In this blog post Im going to detail how you go about setting up a KEMP Applicance as a reverse Proxy. (Note: The setup is the same for the Kemp Range, but today within this guide i will be using a KEMP VLM100)

To start with you need information from your Lync environment around the external Web services. ie: Name etc. For me, my labs external web service is called LyncWebExt.northernlync.co.uk.

Also i will be requiring a public certificate for the KEMP appliance. There are many public authorities out there which can provide this. <At the time of writing GoDaddy are the most competitive in pricing for UCC Certificates) NOTE: If you have a wildcard certificate this can be used on the RP as well.

If you need information on how to create the certificate request follow the link > http://technet.microsoft.com/en-us/library/gg429704.aspx

***Please be sure your public cert has the following on it.

Subject Name / Common Name = <Your Lync External Web name> – LyncWebExt.northernlync.co.uk in my case

SAN Name = <Your Lync External Web name> – e.g. LyncWebExt.northernlync.co.uk in my case YES Put it in as a SAN as well!!!

SAN Name = <Your Lync ‘meet’ service name – e.g. meet.northernlync.co.uk

SAN Name = <Your Lync ‘dialin’ service name – e.g. dialin.northernlync.co.uk

SAN Name = lyncdiscover.<domain> – e.g. lyncdiscover.northernlync.co.uk

So with our information at hand and our certificate provisioned lets move onto the steps required to setup out Kemp.

ALSO: Typically the KEMP appliance for Lync Reverse Proxy, requires be located within your DMZ and NOT on your internal domain.!

Step 1

The appliance will come with a default IP of 192.168.101.1 .  If your running a virtual KEMP appliance then you will see on the black linux dialog the IP address to which is the node. If you are running a hardware appliance plug an ethernet cable into eth0 on the front of the appliance and navigate to the above IP via a web browser

Once youve select the IP with the browser you will be prompted for a username and password. by default this is

Username = bal

password 1fourall

1

Step 2 – Base Line configuration

Now we are on the console of the appliance lets start making the base line changes around the IP’s, local users and passwords etc.

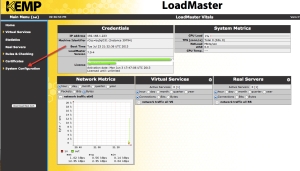
From the Home screen, select on the left hand side to ‘System Configuration’

2

Now select Interfaces, then eth0 and add the IP address to which you will administer the appliance in the future. <for my lab the IP address ive selected is 192.168.1.223/24 (/24 is the subnet range, so tweak this to suit your needs)

3

NOTE: once this is complete the appliance will reset itself onto that IP so be sure you can navigate to it.

Again from the Systems Configuration Menu we are now set give the appliance a name. To do this select local DNS Configuration, then hostname Configuration. Now add the hostname of your choice.

In my lab ive called in KEMPRP1

4

Next we will still using the Local DNS Configuration option – add out local DNS NameServer IP and also the DNS Search Domain name

5

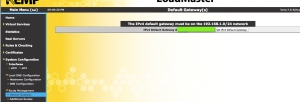
Next we need to select the Route Management Option from the Menu and select default Gateway.

6

Jumping further down the left pane menu you need to select ‘system Administration’, then the user management option

At this point to can change the password for the bal account AND also create a new account with a new username. <I personally always create a username and password which only i know as a backup to loosing or someone changing the main account password>

7

So that is it for the step2 baseline config.

You can if you feel necessary add Logging Config etc. I wont go into enabling that as its simple and straight forward to setup.

Step 3 – Adding a Virtual Server

so jumping back up the menu tree to the top we are now going to create a virtual server. For understanding the virtual server is the DMZ IP address to which the appliance is listening on. e.g your public IP will come inbound to your Firewall, then the firewall should Nat this through to your DMZ on a natted IP address which will match the virtual server IP of your Kemp Appliance.!.

ok so the first step from selecting the virtual service menu is to select ‘Add New’

You will then be prompted for a Virtual Address, which needs to be the DMZ natted IP address! which for my lab is 192.168.1.228

The port you are attaching to this virtual address is 443 as all traffic bound for the Kemp RP will be routed through 443, Next add a service name as an identifier <LyncMobility>, then the last step the Protocol is TCP.

then click ‘Add this Virtual Service’

8

You will then automatically jump to the properties page for the Virtual Machine. This is where you do the main config and server creation.

by default you will have the name you gave the service, the service type of HTTP/HTTPS and activate/deactivate Server <Enabled by Default>

Now select to expand standard options.

Now remove the tick for > Transparency

Add put a tick in the > Use Address for Server Nat

9

Now select to expand the option for SSL Properties

then select the option for SSL Acceleration = Enabled ! NOTE: you will get a warning about no certificate being available for the appliance. just ok this.

Once in the SSL Properties select the reencrypt tick box

now add the public reverse proxy certificate we created earlier by selecting ‘add new’, Also don’t forget to add the intermediate certificate as well

10

— Ignore advanced Properties as nothing needs changing on this.

— If your appliance has the new ESP option, you can ignore this as well

Now select the expand the Real Server Option, and select Add New

111

Now dependant on you default gateway you might be required to select an option in the miscellaneous option under network options to allow you to add a Real Server which is not in the default gateway IP range.

once you placed a tick in the option \> Enable non local Real Servers you will then get an option on the real server creation to bypass the check

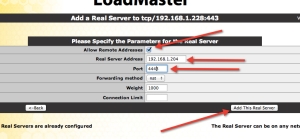
Back on the adding of the Real Server, ive ticked the option to add a non local server, then added the IP address of my Lync Frontend, then we need to change the port to be 4443 for the internal routing, then we can select add

11

then select back, once you’ve had acknowledgement of the creation of the real server

last steps now, still on the real server option area select the checked port as 4443 and hit set checked port, then change the HTTP Method from HEAD to GET

12

Thats it. the set up is complete.

Jump back to Virtual Servers and select View. you will see your service as UP and working.

13

can from your Lync Mobile client log in with your user credentials.

ALSO you can see from the Home Screen graph traffic routing through

14

thanks for looking, and i hope it helps some of you out there.

**Special thank you to Bhargav at Kemp for providing my Kemp Licence.!

Lync 2010 / 2013 – Bluetooth Device Comparison – Jabra Motion, Plantronics Legend, Sennheiser Presence

Good Evening

Today i was looking through the plethora of Lync certified bluetooth devices i have and also carry from site to site as part of my daily job of a UC consultant. It got me thinking that others could benefit from a rundown review of what each bluetooth headset can offer and which out performs the other.

So for this blog post im putting up for review the following UC certified Bluetooth headsets i carry.

Image

(Left to right) Sennheiser – Presence, Plantronics – Legend, Jabra – Motion

For this evaluation I’m going to split the review into three distinct categories, plus an overview and Pricing guide. The three categories are (Sound, Functionality, Usability)

Ok lets start

Sennheiser Presence

  • Sound – The sound and audibles from the Presence device is simply the best out of the three devices without any doubt. I’ve used this in the car, a full office of talkers and it never misses a beat. Sennheiser are seeing this headset as part of there premium range of headset and i can understand why. The call quality is great, using it both via a SIP trunk and connected via a Media Gateway for Lync calls it out performs the rest.
  • Functionality – Sadly although it has three microphones to which it automatically chooses the best to suit the noise tones at the time of the call the Presence does lack some of the other features that both the Jabra and Plantronics have to boot. The Presence is capable (and ive tried it) of a call range of 25 meters from the PC attached mini USB dongle without any sound breakup. It also boosts the best of breed battery life at 10hrs talk time.
  • Usability – I personally find the Sennheiser ear piece uncomfortable for long periods of use, and also the boom arm is very short so i do find myself talking louder. The microphone on this device is ultra-sharp and with the combination of talking louder and the sensitive microphone, i have been asked on many occasion to reduce the sound levels while on a call. :I
  • Unbiased Verdict – if you wanted a headset for pure sound quality then i would stop reading any further within in this blog as the Sennheiser Presence is the device for you. However in the modern age of people wanting more, the presence does lack some of the now standard features what the other devices have. Thats said will i stop carrying the device anytime soon? no… it will be in my bag for tomorrows engagement.
  • RRP – I don’t believe it has been announced yet but i would be guessing around £149 to match the other vendor offerings.
  • Link http://en-us.sennheiser.com/presence-uc

The release date for the Sennhieser Presence is August 2013

Plantronics Legend

  • Sound – This headset has been around now for a few months with me personally seeing it for the first time at the UC Expo in London in March 2013. On the Plantronics stand at that time i thought the sound quality was good in such a well attended arena. Its probalbly worth saying the sound isn’t as clear and sharp as the above Sennheiser presence device. I sometimes find and think on the accumulation of the poor bluetooth range and sound, people often ask me to repeat myself (even today a colleague stated she could not hear me and i was only a distance of10ft away from my machine at the time of that call)
  • Functionality – This is the big dilemma with doing this review each devices is the best in each catorgary. The Plantronics Legend has lots of functionality which i love to use and now just take it for granted until i plug in one of the others. The functionality which i think is worth a mention with the Legend device is….
  1. Pick up to answer – You don’t have to wear the headset all the time and when a call does establish you simply pick up the legend and place on your ear. The device has a sensor which tells it when its picked up and it automatically answer the call for you.
  2. In case charging – So you can imagine you have used the device for calls throughout the day and the last thing you want is a dead device for the following day to come!? the neat thing about the Legend is it has a little battery cell within the carry case so once you’ve finished with it for the day you put the headset back into the case with the assurance that tomorrow it will have another 7 hours of talk time ready for you. (Also the case is magnetised so that ‘everything sticks’ so that little micro usb dongle will never drop out of the case while carrying.!
  3. If you are a desk user the Legend headset also comes with a little magnetic desk stand so at the times when you aren’t using it, between calls you simply place the headset onto the stand for quick contact charging.
  4. Plantronics has also placed within the device the ability for future tech upgrades to the software and rest assured they are coding some good updates for come.
  5. Caller announcement (telco dependant), the headset will tell you whos calling if you have their name in your address book.
  • Usability – At this moment i would say the Legend is my headset default and i use it most days (this might change with more use of the Jabra Motion <1 week old>). Its shape and design suits me. The ear piece fits well with no outside noise leakages when in a call. If there is any real criticism about the legend it would be the bluetooth range and the battery could be better. Plantronics states the range to be 20 plus meters be ive found this to be a lot less, even in a open office. The battery life is 7 hours compared to the 10hours of the Sennheiser Presence.
  • Unbiased Verdict – It hard to fault the Legend really. it does everything you would want from a headset. Like I’ve mentioned above the Legend is my current driver of choice.
  • RRP – £129.
  • Link – http://www.plantronics.com/uk/product/voyager-legend

Jabra Motion – The newest ‘released’ kid on the block

  • Sound – In my opinion the sound quality just falls short of the Sennheiser Presence, but still its very ‘very clear and near on perfect. One of the pros to this headset is a feature which the headset will adjust the headset speaker and earpiece sound based on the surroundings your in.
  • Functionality – The Jabra Motion is up there with the Plantronics Legend AND better for tricks and features. so to mention a few..
  1. 100 meters bluetooth range.. 5 times further almost than the other two devices
  2. NFC technology. Put the headset next to a NFC compatable phone to pair. Simple idea but will be never used in my opinion. <gimmick>
  3. Pick up to Answer.
  4. Voice Control (Answer and End) if the headset is being worn at the time of a call.
  5. Boom arm open/close to answer/end a call
  6. Custom Fit ear pieces. The Motion is the only headset to offer this.!
  • Usability – As stated earlier in the posting, I’ve only had the Motion for less than a week so i cant honestly say ive put it through its paces, that said its been faultless to date. I like the ear pieces and the device sits nice on my ear. It terms of the tech, i personally don’t think the voice control will be something i would use AND the NFC option is just a joke.! (how many times do you need to pair your headset to your Mobile? Once!!). One dislike is the bulky hardcase it comes in? i wonder what the designer was thinking (or not thinking) when he/she created it. Again the Jabra Motion comes with 7 hours talk time.
  • Unbiased Verdict – First impressions are excellent for the sound quality and also the wearing of the headset. The only reason why i didn’t use it today was that it was out of battery so i opted of the Legend which had a full 7 hours battery time due to the case. Like other UC Consultants i spend time in server rooms and telecoms rooms and the motion is ideal for taking a call when away from my PC.
  • RRP – £149
  • Link – http://www.jabra.com/products/wireless_headsets/jabra_motion_uc_series

Overall Verdict

This is a hard one, as it is really horses for courses. Not one headset outperformed the other. To rationalise my opinion i would say the following

– If you are a person who wants the best sound quality then in my opinion the Sennheiser Presence is the best

– If you are a person who spends hours on telephone and wants comfort with the assurance that the headset is always charged then the Plantronics Legend is the one.

– If you are a person who wants a comfort fit with good sound quality and a long range of connectivity then the Jabra Motion is the one

For me the headset i always look for first out of my bag is the Jabra Motion and the Plantronics Legend as both of these suit my work life.

Thanks for reading.

Regards

Iain Smith

Update: 22nd August 2013

Please see later review of the Sennheiser UC Presence Device, as the above review was using a early version of the headset and now recently Sennheiser kindly sent me the rtm version which is excellent and is my preferred headset of choice. link is https://northernlync.wordpress.com/2013/08/20/lync-2013-sennheiser-uc-presence-full-review/

Lync 2013 Cu2 Patch – Broke some Icons in Lync and Outlook

NorthernUC

Evening.

Following the recent Lync 2013 CU2 update release, this evening I thought id update my Lync 2013 client with all the new CU2 goodness. Problem is even though the update was successful I saw some of my icons become weirdlike and the wrong size, and were more in line with windows 3.1 than office 2013.

5

6

7

On further investigation and after a full removal of the Lync client and the patch and reinstall, I thought it would be good to update my win8 machines windows patching. On running the windows update module it came back with an update for Office and also a update for Windows 8. (the one of interest is the Office update KB article stated in the update is http://support.microsoft.com/kb/2817489). when you read the KB the second item for the fix is the icons, therefore it became a no brainer to run these in. <sorry im unable to screengrab the updating> (expect a reboot…

View original post 20 more words

Lync 2013 Cu2 Patch – Broke some Icons in Lync and Outlook

Evening.

Following the recent Lync 2013 CU2 update release, this evening I thought id update my Lync 2013 client with all the new CU2 goodness. Problem is even though the update was successful I saw some of my icons become weirdlike and the wrong size, and were more in line with windows 3.1 than office 2013.

5

6

7

On further investigation and after a full removal of the Lync client and the patch and reinstall, I thought it would be good to update my win8 machines windows patching. On running the windows update module it came back with an update for Office and also a update for Windows 8. (the one of interest is the Office update KB article stated in the update is http://support.microsoft.com/kb/2817489). when you read the KB the second item for the fix is the icons, therefore it became a no brainer to run these in. <sorry im unable to screengrab the updating> (expect a reboot after the update)!

So following the reboot the icons looked good again.

9

10

11

Simple fix in the end

Regards

Iain Smith

Lync 2013 Client and Proxy Prompting issue

Adding further exclusions to the Proxy-authentication

NorthernUC

Good Afternoon All

Following the addition and implementation of your Lync 2013 estate.

What is seen to becoming an annoyance for a lot of customers and people is the forthcoming Lync 2013 client deployment and the new adhoc ‘feature’ which is when you log onto the client and your company uses a web proxy OR has a proxy pac working internally, your user is prompted for additional higher privileged credentials. If the user simply ignores this prompt it will continue to plague them until they do enter the higher AD user privileges.

This is a new ‘feature’ which wasn’t seen with Lync 2010, so why is it happening now with Lync 2013.?

Simple answer is Microsoft has changed the logic for the client login routing. Now with Lync 2013 it firstly checks some HTTP addresses to locate the Lync 2013 registrar information, then if that fails it then by design it goes away and looks for the…

View original post 261 more words

Adding Custom Presence Status to the Lync 2013 Client

In this blog post I will run through the two ways you can add the custom Lync presence status to your company Lync users estate or to your own personal Lync 2013 client.

The way I see this is, if you are an administrator then using powershell and policies you can go to a good level of custom presence integration within your Lync environment. If you are an end user and you want to create your own custom presence status, then this can be done without the need of your IT team (The caveat around this is you need access to the registry on your machine and usually this requires admin credentials.)

Firstly we will look at the Administrator way of creating the custom presence within the Lync Environment

step 1

We need to create a custom Presence XML file this is the file Lync will read to get the unique new presence statuses

format needs to be the following

<?xml version=”1.0″?>
<customStates xmlns=”http://schemas.microsoft.com/09/2009/communicator/customStates“>
<customState ID=”1″ availability=”online”>
<activity LCID=”1033″>Working from Home</activity>
<activity LCID=”1044″> </activity>
<activity LCID=”1055″> </activity>
</customState>
<customState ID=”2″ availability=”busy”>
<activity LCID=”1033″>In a Lync Meeting</activity>
<activity LCID=”1036″> </activity>
</customState>
<customState ID=”3″ availability=”busy”>
<activity LCID=”1033″>Meeting with Client – Public Sector</activity>
<activity LCID=”1055″> </activity>
<activity LCID=”1036″> </activity>
</customState>
<customState ID=”4″ availability=”do-not-disturb”>
<activity LCID=”1033″>Interviewing</activity>
<activity LCID=”1036″> </activity>
</customState>
</customStates>

Now Save this a .XML format file. (Save it onto your local drive, then in time we will copy this to a file share or the root of your Lync 2013 server

In this post im going to copy the file to the Lync frontend in my lab. (NOTE: you need to copy it to a server/desktop which has webserver enabled and working.

for my lab the path is, https://lync2013.northernlync.co.uk/clientpresence/Northernlync_custompresence.xml

1

Once your added and tested the path and it returns the custom states in a IE page then you are good to continue. If you don’t get the custom states then you need to jump back into IIS and fix your Virtual directory folder path.

Step 2

Now we need to go into the Lync Management Shell on the Lync 2013 frontend.

At this point we can do one of two things. 1, we can add the custom presence to an existing client policy or 2, we are required to create a new Client Policy.

<to add a new client policy the PS command will be –

New-CsClientPolicy -Identity NorthernlyncCustomStates -CustomStateURL “https://lync2013.northernlync.co.uk/ClientPresence/NorthernLync_customstates.xml

Once ive ran the above you can see its created the policy

2

Step 3

We now need to assign the policy to a user.

again using powershell you need to grant the policy using the following command Grant-CsClientPolicy -Identity “<username>” -PolicyName <nameofcustompolicy>.

eg: Grant-CsClientPolicy -Identity “Iain Smith” -PolicyName NorthernlyncCustomStates.

3

Now get the user to log out of the Lync Client and relog back in. (don’t forget to Kill the lync.exe off before logging back in)

4

There you have it.. a Lync Client Policy based Custom Presence.

—————————————————————————————————

Now lets look at a way you can do it a an individual user of Lync. – I would go as far as saying this option would always a secondary option, and im just detailing it for this blog and would never suggest it to one of my customers.

STEP 1

Same again we start with the creation of the .XML file in the same format.. (this time I’m going to change the names of the states so that we can see the new ones are getting picked up)

<?xml version=”1.0″?>
-<customStates xmlns=”http://schemas.microsoft.com/09/2009/communicator/customStates“>
-<customState availability=”online” ID=”1″>
<activity LCID=”1033″>In the Lync Lab</activity>
</customState>-<customState availability=”busy” ID=”2″>
<activity LCID=”1033″>SuperBusy</activity>
</customState>-<customState availability=”busy” ID=”3″>
<activity LCID=”1033″>Meeting with Client – Lync Call</activity>
</customState>-<customState availability=”do-not-disturb” ID=”4″>
<activity LCID=”1033″>Blogging</activity>
</customState>
</customStates>

STEP 2

Save the .xml to a place on your own machine. ie: C: etc etc – for me im saving it to c:\Users\smitiai\Downloads on my local desktop machine which is running my lync 2013 client

STEP 3

We need to go into the registry now and add the paths into the folders for the Lync client startup process to hook into them.

goto start – regedit (might need Admin credentials at this point)

navigate to or Add HKEY_LOCAL_MACHINE\SOFTWARE\Policies\Microsoft\Office\15.0\Lync\EnableSIPHighSecurityMode

and set the dword = value 0

5

no navigate to OR add HKEY_LOCAL_MACHINE\SOFTWARE\Policies\Microsoft\Office\15.0\Lync\CustomStateURL

6

again log out of the Lync client, kill the process then log back in to pick up the new custom states

7

That’s it.

Thanks

Iain Smith