Complete Lync 2013 Installation Guide including – Edge Server installation PART 5 of 6

Hello All

Part 4 of the 6 part series on how to install and configure a fully functional Lync 2013 enterprise edition deployment.

Please check out the other parts at the links below

Part 1 Complete Lync 2013 Installation Guide including – Pre Reqs, Enterprise Edition Pool, SQL Mirroring and Witness, Archiving/Monitoring, Persistent Chat, Edge Setup and XMPP integration PART 1 of 6

Part 2 Complete Lync 2013 Installation Guide including – Pre Reqs, Enterprise Edition Pool, SQL Mirroring and Witness, Archiving/Monitoring, Persistent Chat, Edge Setup and XMPP integration PART 2 of 6

Part 3 Complete Lync 2013 Installation Guide including – Web Access WAC, Archiving and Monitoring Server and Reports PART 3 of 6

Part 4 Complete Lync 2013 Installation Guide including – Persistent Chat Installation and configuration PART 4 of 6

Following on from the above links to my complete Lync 2013 installation guide, below are the details on how to set up a Lync 2013 edge server for federation and remote access. PART 5

Info for your understanding

– My edge server is built on Windows 2012 and will be called Lync2013edge

– I WONT be using NAT’ing in this Lab.

Internal server IP address 10.37.129.4

– I will be using 3 External IP addresses

89.114.67.110

89.114.67.111

89.114.67.112

Externals Names

– sip.northernlync.co.uk

– wc.northernlync.co.uk

– av.northernlync.co.uk

Edge Server PreReqs

– .Net 4.5 for from the Windows 2012 Roles and Features

– Powershell 3.0 (Part of Windows 2012 Server)

– Windows Foundation Feature http://go.microsoft.com/fwlink/p/?linkId=204657

– Copy of the Lync 2013 installation files locally to the edge server.

So to note: As part of the installation, the edge server is within my DMZ and not attached to the northernlync.local internal domain. We need to do a few things to prep the server ready for the edge install.

Prep 1

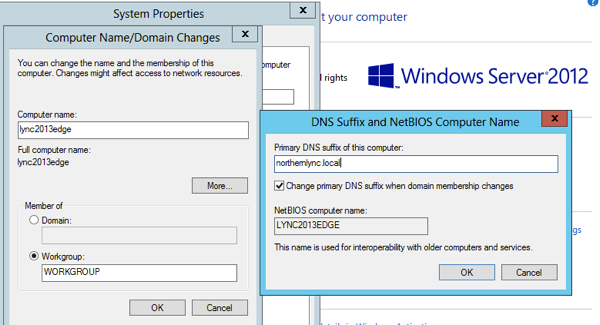
Adding the DNS suffix to the edge server even though its part of a workgroup.

goto the server properties and add the name of your server, then select ‘more’ and add the DNS suffix of your internal domain. In this lab case thats northernlync.local
NewImage

Once you’ve rebooted your server, and also copied over the Lync 2013 media locally you are set to start the installation.

What we will do next is add the information into the Lync 2013 topology

————————————————————————————————————————————————————————————————————————————————————————

Lync 2013 Topology Update

Ok so lets move onto the update requirements within the topology

Firstly open up your topology on your Lync 2013 frontend. (I won’t screenshot how to open up the topology then download/save as i would expect you to know this by now)

Adding your edge server to your topology

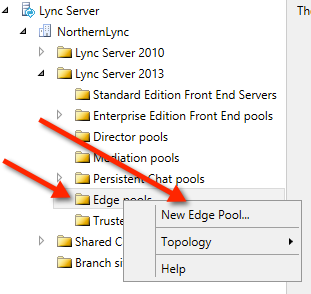
Firstly navigate down your topology site and right click on the ‘new edge pool’ option
NewImage


Once you’ve right click, next through the first welcome page until you get to add the information about your edge server.
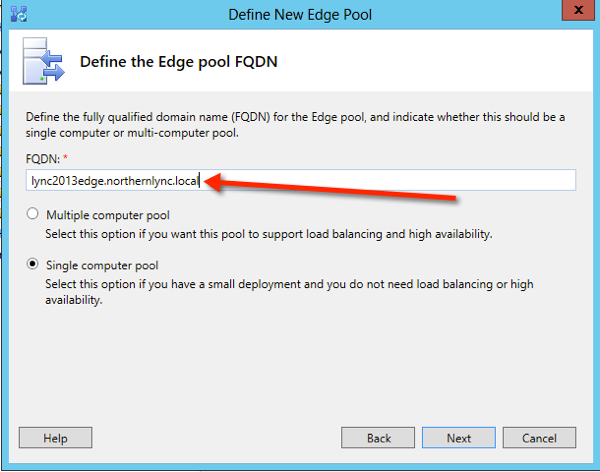
NewImage


On the next page you have a few options.

  • Use a single FQDN and IP address
  • Enable Federation 5061
  • Enable XMPP Federation

For this lab and i guess for the majority of Lync installations you would only have to select one option which would be ‘Enable Federation 5061’
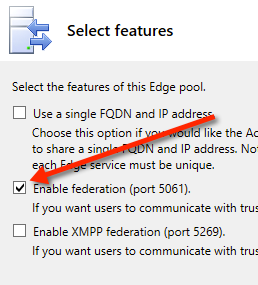
NewImage


On the next dialog page,  you have the option for NAT’ing and also for using IPV6.

For this lab we won’t be using NAT’ing or IPV6. Therefore i will be accepting the defaults.
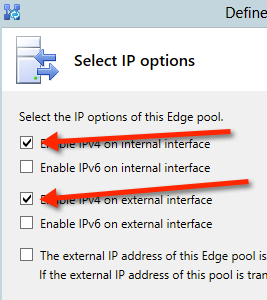
NewImage


Next is to add information about your external FQDN names

(to recap my internal domain is northernlync.local and my external domain name in northernlync.co.uk)

Once you’ve added your names, press next
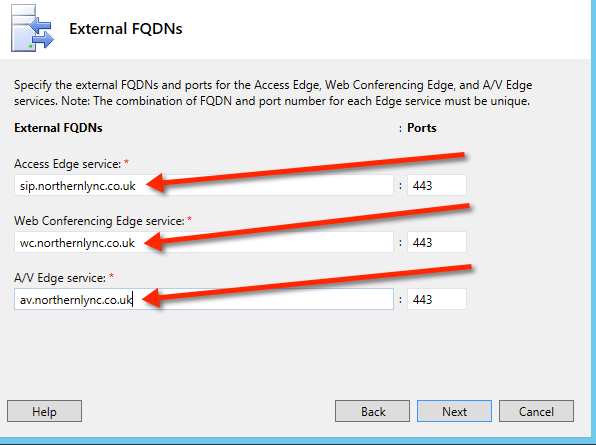
NewImage

If you are NAT’ing at the next screen you will be asked to add the internal NAT’d IP address.

In our case as we will not be NAT’d we are prompt to add the Internal IP address. Once you’ve done this press next

Now add your external IP addresses for each area required, then press next
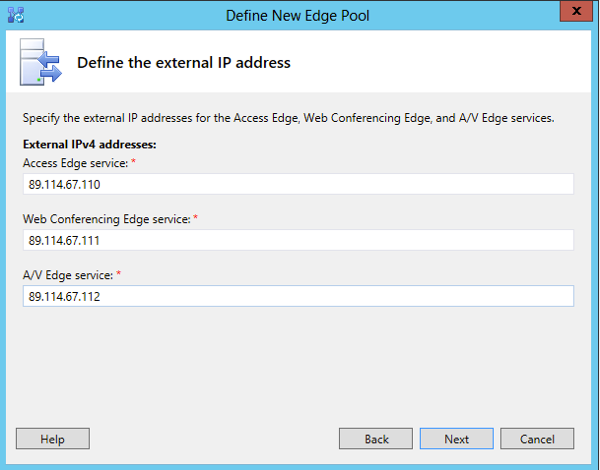
NewImage

Select your next hop Lync 2013 pool from the drop down and press next

Then select the pool to associate with the edge server for connectivity. this is usually the same pool as your next hop pool from the previous page.

Then click finish.

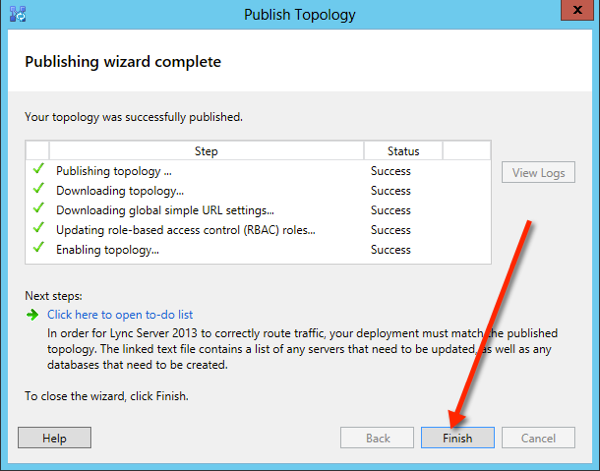
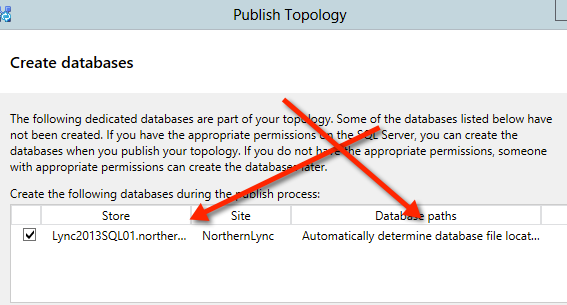
Then publish your topology
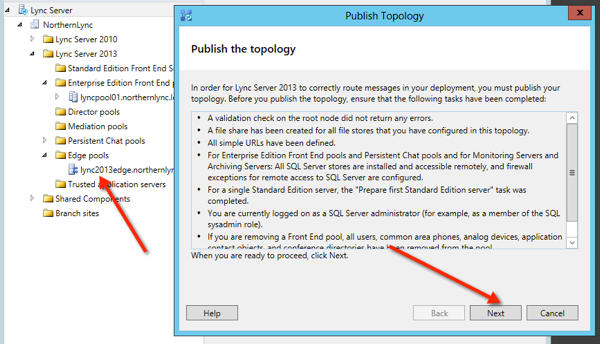
NewImage

NewImage

Now we are almost finished on the Lync Frontend.. the last item we need to do i copy over the cms configuration to the edge server for population.

Using the below command export a copy and move it over to your edge server

Export-csconfiguration –filename c:\topology_export.zip
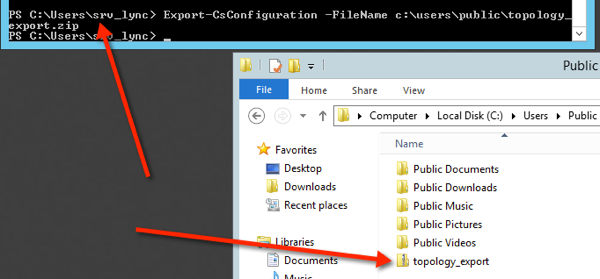
NewImage

Now copy that .zip file to edge server

We are now finished on the Frontend topology.

While we are still on the FE01 lets add the required permissions to the control panel groups for edge enablement

————————————————————————————————————————————————————————————————————————————————————————

Adding permissions into the Lync Control Panel

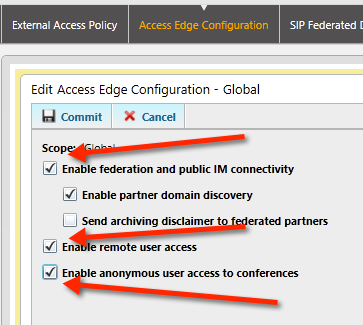
Once your in the control panel, select the option ‘federation and external access’ tab on the left pane

Double click or select the global option, then select the options you want.

In our lab demo I’m select federation, remote access and PIC
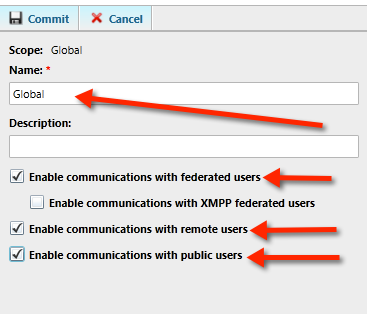
NewImage


Also based on the information your require i.e.: open federation etc, you will need to configure the other tabs within the control panel.

for this demo we are going to go open federation.
NewImage


We are finished now on this we are allowing open federation throughout our demo lab edge setup

————————————————————————————————————————————————————————————————————————————————————————

Running the installation on the Lync Edge server to add the required components 

Run the setup and you would normally do and get to the point of the deployment wizard panel

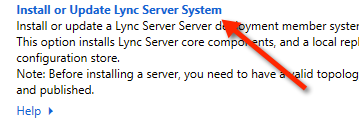
then select ‘Install or Update Lync Server system’ option

Then select and complete step 1, and select the .zip file for the csconfiguration when prompted.
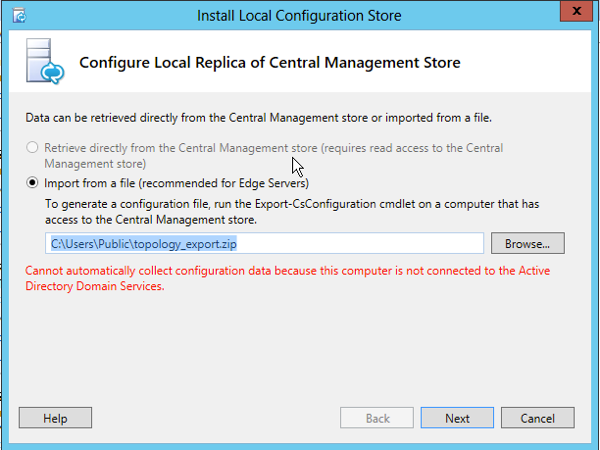
NewImage

NewImage

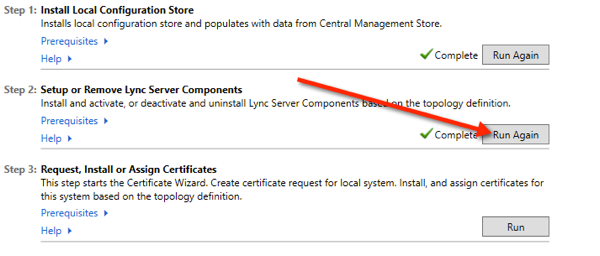
Now that this has finished with success, run step 2, click next
NewImage

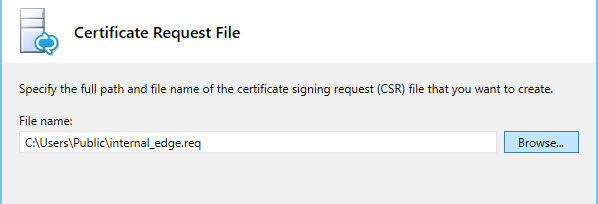
Now run step 3 and arrange for your internal certificate to be prepared offline as we don’t have access to the internal CA as we are not within that domain on our edge server

prove a location for the .txt file
NewImage

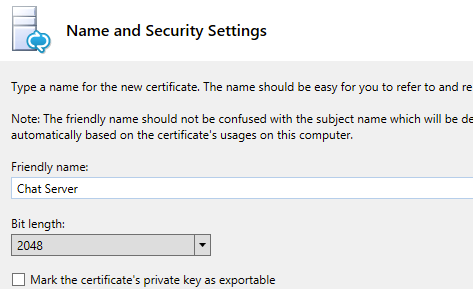
Next through the next screen, then give your vert a friendly name.. in our case I’m going to call it Lync2013Edge. (there is no need to mark it exportable, as we are using a single edge server)

now give it your company name, and location, then next

Ensure you subject name is your Lync server name, then select next

Next page we don’t require any additional subject names, proceed to select next

then next, check your information then again select next

you will then get a txt file like the below.
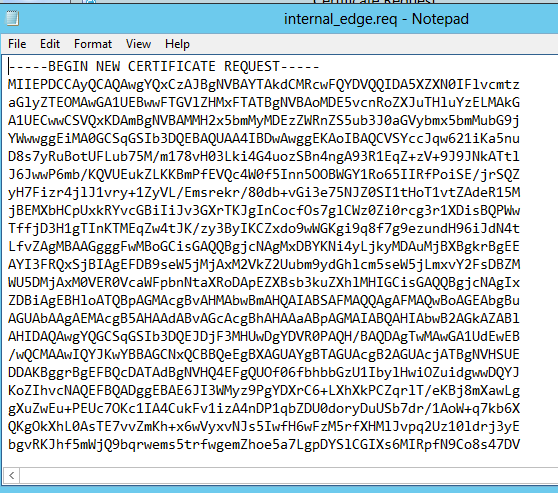
NewImage


At this point run this through your CA web portal. then assign the certificate

—– Public Cert

Now do the same with the public cert, then pass this to your public CA ie: go daddy, comoro etc.

then assign to the public certificate

Now start the services and test.!

Useful tips and tools for edge

check the replication status – you can validate the replication of configuration information to the edge by running the Windows PowerShell Get-CsManagementStoreReplicationStatus cmdlet on the internal computer on which the Central Management store is located

Remote Connectivity analyser https://www.testexchangeconnectivity.com

Thank you for looking. and i hope the above makes sense and provides you with a functional edge topology.

Regards

Iain Smith
Complete Lync 2013 Installation Guide including – Persistent Chat Installation and configuration PART 4 of 6

Hello All

Part 4 of the 6 part series on how to install and configure a fully functional Lync 2013 enterprise edition deployment.

Please check out the other parts at the links below

Part 1 Complete Lync 2013 Installation Guide including – Pre Reqs, Enterprise Edition Pool, SQL Mirroring and Witness, Archiving/Monitoring, Persistent Chat, Edge Setup and XMPP integration PART 1 of 6

Part 2 Complete Lync 2013 Installation Guide including – Pre Reqs, Enterprise Edition Pool, SQL Mirroring and Witness, Archiving/Monitoring, Persistent Chat, Edge Setup and XMPP integration PART 2 of 6

Part 3 Complete Lync 2013 Installation Guide including – Web Access WAC, Archiving and Monitoring Server and Reports PART 3 of 6

Part 4 – Installation and configuration of Persistent Chat

Thanks for checking back everyone. I hope you find the below useful.!

So to recap we have built our servers, we’ve add our topology information (Part1), we’ve installed our Enterprise edition servers with SQL Mirroring (Part2), we’ve added the WAC server for Powerpouit presentation as part of conferencing and now its time to configure and install persistent chat.

Starting with Adding the Chat server to the topology.

Open up your topology. (for me that means jumping back onto one of the front-end servers as i don’t add the admin tools to all my Lync servers.

Lync2013fe01 is the server of choice.

NewImage

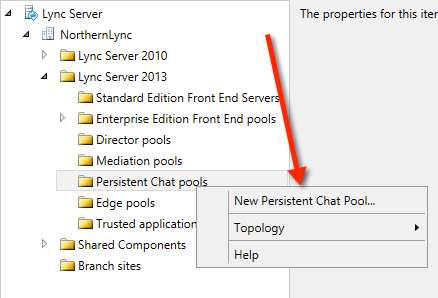
Navigate and open your Lync 2013 Pool, and right click on the persistent chat option to select to add a new chat server.

NewImage

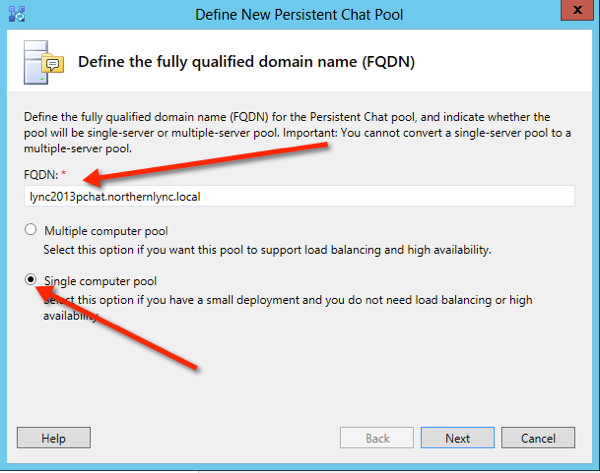
For my lab and guide I’m not going to have the Chat servers as a pooled topology. Im selecting it as a single server.

NewImage

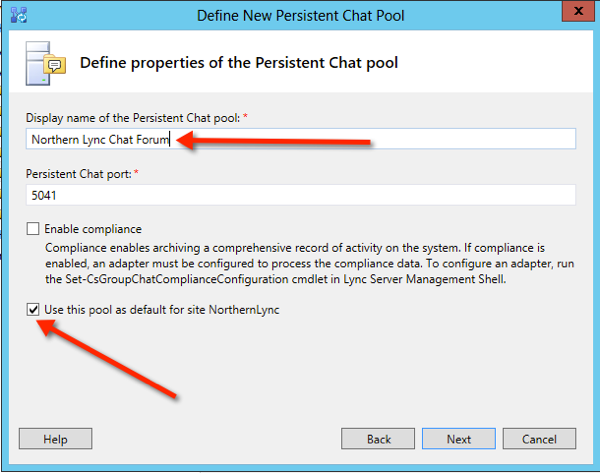
The next page you need to give your Chat Pool a name which will be seen by all chat users.

If your company is governed by compliance you can also add this into your achieving topology if you have that option enabled for Lync 2013

Also you have the option to make the pool the default. (if you are creating it as a passive pool then don’t tick this option)

NewImage

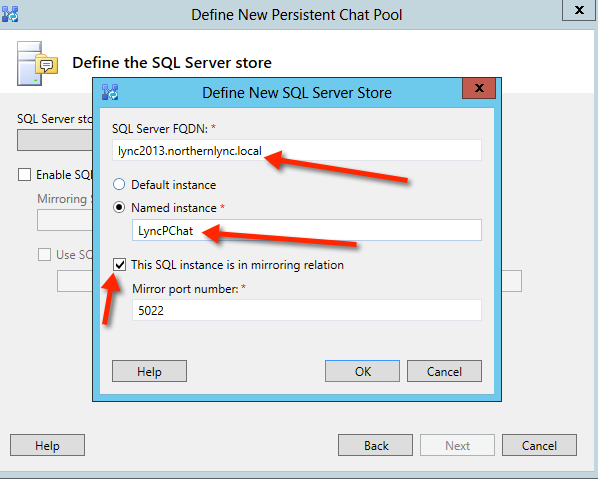
The next step is to select your SQL Server and instance.

For our guide I’m using a separate instance for all my pools, but I’m using my Mirrored SQL Server to home the PChat Services

LyncCore – Lync 2013 Frontends

LyncArcMon – Archiving and Monitoring

LyncPChat – Persistent Chat

NewImage

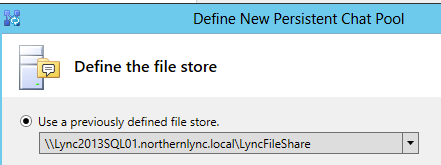
Now select your fileShare. Again I’m going to collocate the Chat files into my global Lync file share called LyncFileShare

NewImage

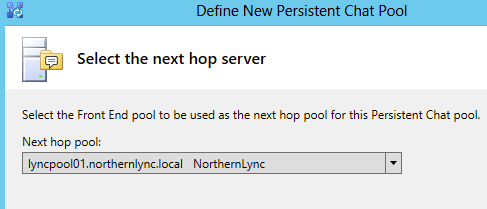
Add your next hop pool. By default it will select your main Pool

NewImage

Select Finish.. then publish your revised topology

When select next through the publish dialog’s you will prompted to change if required the SQL storage as part of the Pchat database installation.

NewImage

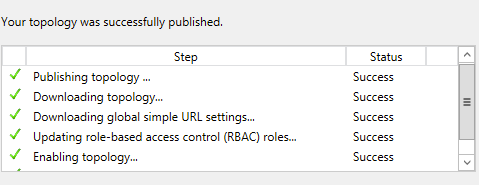
Make sure your topology publishes without errors. if you do get errors or warnings ensure you fixed them republish until your fully successful

NewImage

Ok we are now finished with the topology element, so now its time to move onto the LyncChat server installation

Persistent Chat Server Pre Req’s (Roles and Features)

– Windows Identity Foundation (This is part of the Windows 2012 Features function)

NewImage

Now install the deployment wizard. (the lync 2013 setup.exe)

you will already see a green tick in the prepare activity directory

now select the ‘install and update Lync Server system’

NewImage

Run through the steps again starting at 1,2,3 (you do require a certificate for the chat server, so use your CA)

NewImage

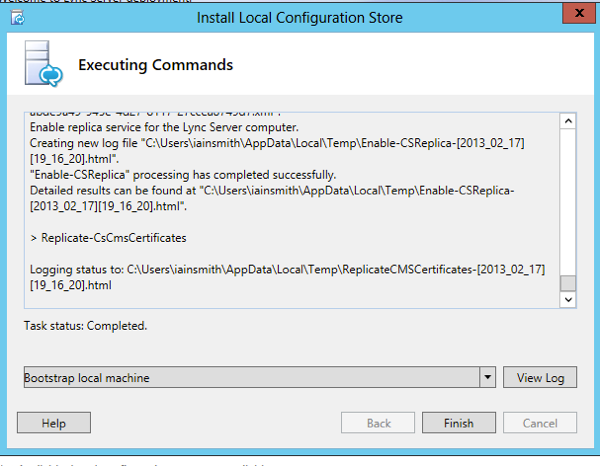
Once you’ve generated and assigned your certificate from your CA to the chat server. it time to start the services

NewImage

Run Step 4 and start your services

NewImage

—————————————————————————————————————————————————————————————————————————————————————-

Persistent Chat – Chat Configuration

Now go back to your lync control panel and from the left hand pane select > persistent chat. At this point you need to have an idea of the type of chat categories you are going to enable.

For the purpose of the lab demo or chat category will be about and sudo issue relating to ‘Lync 2013 enabling of Users’

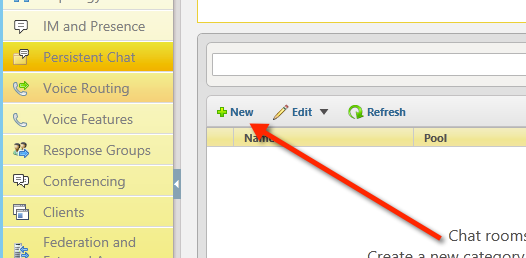
Once your in the chat profile in the control panel, select New

NewImage

Select your Chat Pool, and next

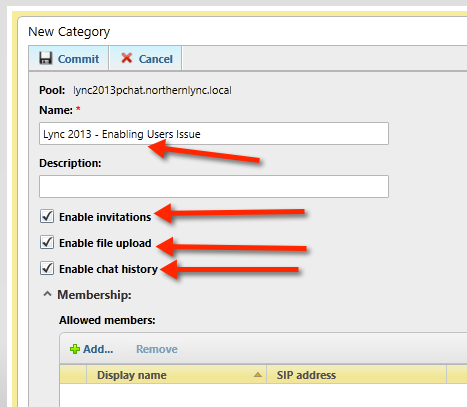
Add the name of your category. In our case Lync 2013 – Enabling Users Issue

Im also going to select to invite people to the chat forum, and also enable upload, enable chat history.

NewImage

Then I’m going to add my members. Im only going to add my own Lync demo user called Iain Smith

Click add on allowed members and search then add your member/s.

Also I’m going to add user iain smith, as a creator who can add rooms to my category. The commit your actions

NewImage

you then need to tab to the Persistent chat policy and ensure chat is enable as the chat feature

NewImage

Thats it from the Lync client your user should be able now to select the chat option and add new rooms to the chat forum and also add other users to the chat forum.

Thanks again for looking

Regards

Iain Smith

Powershell 3.0 gets a new hidden GUI user interface

Evening All

i thought i would blog a quick snippet of information about a neat feature in powershell 3.0. On opening PS up from your windows 2008r2 server type <show-command> were you will be presented with a great guy for doing the day to day tasks. For me these are great for Lync commands.

have a go.

NewImage


NewImage


enjoy!

Adding DHCP Settings for Lync Phone Editions by Tom Arbuthnot of Lyncdup

All credits to this blog posting goes to Tom Arbuthnot as its his blog posting.

I thought id republish it, as its a excellent writeup on something that is not necessarily  fully understood by some.

check out Toms Blog site and postings.

http://lyncdup.com/2013/02/setting-up-dhcp-server-options-manually-for-lync-20102013-phones/?utm_source=dlvr.it&utm_medium=twitter&utm_campaign=Feed%3A+LyncdUp+%28Lync%27d+Up%29


Complete Lync 2013 Installation Guide including – Web Access WAC, Archiving and Monitoring Server and Reports PART 3 of 6

Hello all, and welcome to part 3 of the Installation guide for Lync 2013 enterprise edition with all the extra features enabled and working.

In part 3 we are going to go into install the WAC server (web access server), and the Achiving and Monitoring plus testing to ensure all is fully functional.

Be sure to look back soon for part 4!!

If your unsure whats gone on before part 3 i.e.: part 1 and 2 select the links below.

Part 1 Complete Lync 2013 Installation Guide including – Pre Reqs, Enterprise Edition Pool, SQL Mirroring and Witness, Archiving/Monitoring, Persistent Chat, Edge Setup and XMPP integration PART 1 of 6

Part 2 Complete Lync 2013 Installation Guide including – Pre Reqs, Enterprise Edition Pool, SQL Mirroring and Witness, Archiving/Monitoring, Persistent Chat, Edge Setup and XMPP integration PART 2 of 6

Enjoy the guide and i look forward to any feedback and retweets!

Ok lets start from the top with the Web Access Server install

WAC PreReq’s

From the Server Run powershell AS ADMINISTRATOR and copy the following script it

firstly type Set-ExecutionPolicy 1 then select Y as this will allow you to run powershell scripts at a later time

NewImage

Now run the follow command in powershell

Import-Module ServerManager

then the following

Add-WindowsFeature Web-Server,Web-WebServer,Web-Common-Http,Web-Static-Content,Web-App-Dev,Web-Asp-Net,Web-Net-Ext,Web-ISAPI-Ext,Web-ISAPI-Filter,Web-Includes,Web-Security,Web-Windows-Auth,Web-Filtering,Web-Stat-Compression,Web-Dyn-Compression,Web-Mgmt-Console,Ink-Handwriting,IH-Ink-Support

Once the modules have installed if your are running windows 2008 you will be prompted to restart the server at this point.

next step is to install the WAC services ***If you the need the WAC software you can download link here http://www.microsoft.com/en-us/download/details.aspx?id=35489

Now at this stage run the setup.exe.
(i thought id put this into the blog as i got this error, again nothing to major just a couple for further prereqs for Win2008r2 server). you would not see this error on windows 2012

NewImage

NewImage


I've added the links to the missing files here 
.net 4.5 http://www.microsoft.com/en-us/download/details.aspx?id=30653
IIS update http://www.microsoft.com/en-us/download/details.aspx?displaylang=en&id=27929
Powershell 3.0 http://www.microsoft.com/en-us/download/details.aspx?id=34595

-- Following the issue and now installed components the screenshot of the successful install

NewImage


Double click it to run the .exe file. Accept the terms and conditions and away you go.

Once this installation is complete its best practice to install the wac language pack as well as without this it could trip you up at a later date. (and its only 25mb) so nothing to taxing. again the link to the pack is here http://www.microsoft.com/en-us/download/details.aspx?id=35490

NewImage


NewImage


——- The WAC server setup is now complete.  So at this stage we need to go back to the Front-end of Lync 2013 for the topology and adding our WAC details within it.

Open your Lync 2013 topology and save it as normal, then navigate to the shared components

NewImage

select the new office web apps server option.

Now add your wax details

NewImage

NewImage

Now publish your topology. Once you’ve published and its come back error free. your complete.. Now its time to test the powerpoint presentations.

—————————————————————————————————————————————————————————————————————————————-

Ok lets start the Archiving and Monitoring install

The first step is to add the required details back within the topology.

So open and save your topology, then navigate to your enterprise edition pool and right click to edit the properties.

Scroll down to the area were we need to add the required details

NewImage

select the archiving option, then add your SQL details

NewImage

Now add the required details for Monitoring.. this should be as simple as just selecting it from the option drop down as below

NewImage

Now Publish your topology.

NewImage

you will be prompted to select a alternate database configuration. For my lab i just accepted defaults

NewImage

Once you get the successful publishing of your topology, its time to rerun the deployment wizard on your frontends to add the archiving and monitoring services.

NewImage

As you can see we don’t have to run step1 or 3 as we already have the local CMS store homed on the frontend. And for step 3 we don’t require any further certificates as Archiving and monitoring don’t require them to function.

So simply select step 2 and Run…

The command should complete without issue. (as below).. however if you do get errors you will need to investigate the issue before you continue.

NewImage

Next Step now is to start the services for Archiving and Monitoring. Step 3

NewImage

Check to make sure that the frontend service restarts successfully. you will not see individual services for archiving and monitoring as they are part of the frontend service.

Before

NewImage

After

NewImage

Now we are now complete

—————————————————————————————————————————————————————————————————————————————-

Last step now, lets start the Monitoring report installation

From the deployment wizard, select deploy monitoring reports

NewImage

NewImage

If you need to change your reporting services server, then this is the point to do so.

For our Lab deployment then we are going to accept the defaults

once its run through the deployment you should be presented with a screen like below.

NewImage

Now lets jump back to the lync control panel and check that our report services are selectable (if you already had the lync control panel open you will need to close it and reopen it to see the monitoring option)

Select the reports

NewImage

there you have it.. if you have followed the above you should have now your reports up and running

NewImage

Finished….

Thats it for Part 3. check back in a couple of days for Part 4 which will be persistent chat install and configuration.

Again happy to take comments, and please retweet.!

Regards

Iain Smith, NorthernLync.

Complete Lync 2013 Installation Guide including – Pre Reqs, Enterprise Edition Pool, SQL Mirroring and Witness, Archiving/Monitoring, Persistent Chat, Edge Setup and XMPP integration PART 2 of 6

Following on from PART 1, This post will no go into detail about implementing and installing Lync 2013 onto your Frontend servers.

Firstly lets just confirm again that there are a few pre requisites which are required before the fronted services can be implemented. These pre reqs can be found in the part 1 of the guides.

Lync 2013 Frontend Specs

Microsoft recommend the following frontend infrastructure to support Lync 2013

6Cores
32gb Ram
72gb Disk Space
At the time of writing this will be the minimum requirements and will have the ability to home 6600 users per server

————————————————————————————————————————————————————————————————————————————————————————

Let move onto the installation.

Navigating back to your start menu again select the ‘Lync Deployment Wizard’

1

If you have followed part 1 when the deployment wizard opens you should see green ticks as per image below.

Now select ‘Install or Update Lync Server System’

2

The next step is key, and you should check all the PreReqs for the install are met before select Run

For this lab build i added RTCUniversalServerAdmins to my srv_lync account.,

Once your are happy select ‘Run’

3

Once you pressed run on the next dialog leave the default radio button pressed for Retrieve directly from the central management store

Select the ‘Next’ Button

4

On clicking next the wizard will then proceed to install the required modules to home the CMS database locally.

Once you get the dialog saying complete move onto step 2

6

Click Next to move through the wizard
Ensuring the Step 2 has successfully installed its time to move onto the certificate placements.

Select Step 3 Run

7

On the below certificate dialog if you have an internal CA then leave as default, else select the bottom option to prepare the request for later.

then select Next

8

Once you’ve requested your certificates from your CA import and enable them for Lync 2013.

9

Now lets start the services.

10

NOTE: For my lab I’ve also added a few users for testing purposes within AD. The Lab machines are using Windows 8 with win8lab1 running Lync2010 and winlab2 running Lync 2013.
If we have all our initial DNS entries correct for the front ends, which we set up for using DNS load balancing and automatic configuration using the service record we created in PART 1 of the PreReqs blog no further  changes are needed to be made to the Lync 2013 client for logging in as it should be automatic.

Onto Part 3 soon