Lync 2013 – Force the Lync client to always ‘show User Picture’ – video guide

Good Morning

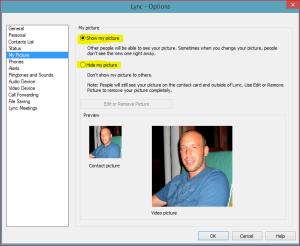
This blog post and video guide describes how to force the Lync 2013 client to always show the end users Lync picture even after the user might have changed the setting not to show the picture.

pic1

To but a little bit of background around this, as with Lync 2010, Lync 2013 does not have the ability to block or stop a user from deselecting the option of showing their Lync picture.  This picture element is something I’m asked many times while working with customers.

I know this is something which we all would like as a option but as of today and as far as I’m aware this isn’t something close to Microsoft’s heart in fixing or providing a solution.

Also to confirm there isn’t any policies you can assign OR and registry setting to can associate to block the user changing their setting. So what solution and where is this setting stored….. Well its not in the xds database and actually its started within the front ends rtclocal database.

So to confirm before you go any further in the blog, I’m pretty certain that this solution will be one thats unsupported from Microsoft and also one that as we are going to change the rtclocal will be seen as a ‘borderline’ hack. Also i would like to point out I’ve ran this within my lab without issue for sometime, however i would suggest you test it within your lab area before you embark on using it in your production environment. <remember I hold no responsibility> 🙂

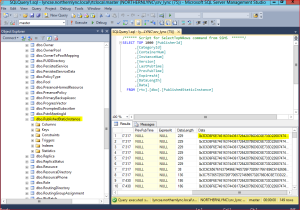
Ok no the small print is out of the way, what is the fix.. ?? Within the rtclocal there is a table called publishedstaticinstance which has a field that holds a massive binary value. As part of the challenge is to convert the binary into something thats readable and something we can update

pic2

Under the covers what this binary code states is DisplayADPhoto true/false.

So as part of the update we change for the status and update accordingly when the status is false.

As this is running on rtclocal, the way the guide runs this is via a scheduled task running a .ps1 powershell command. Also the SQL only checks the last 15 minutes of changes to reduce locks and database processing. Also the scheduled task I’ve created runs every 15 minutes so with the two you will never be out of sync with what a user is doing. (you could run this script more regular than every 15 minutes but given the requirement i think 15 is a good medium to use).

As for the SQL command some thanks go out to the tech net community as understanding the converts within the SQL was a slight challenge.

PS1. Script

function Enable-UserPhotos ($Domain, $OffSet) {(Get-CsPool (Get-CsComputer “$(hostname).$Domain”).Pool).Computers | % {Invoke-Sqlcmd -Query “update rtc.dbo.PublishedStaticInstance Set Data = CONVERT(image,convert(varbinary(4000),REPLACE(convert(varchar(4000),convert(varbinary(4000),Data)),'<displayADPhoto>false</displayADPhoto>’,'<displayADPhoto>true</displayADPhoto>’))) where [LastPubTime] >= DATEADD(mi,-$($OffSet),getdate()) AND convert(varchar(4000),convert(varbinary(4000),Data)) like ‘%<displayADPhoto>false</displayADPhoto>%’;” -ServerInstance “$($_)\RTCLOCAL”}
} Enable-UserPhotos -Domain ‘your domain name here’ -OffSet 15

KEY TAKEAWAYS

Remember the script is changing the rtclocal database on the fronted and this will be seen as not supported by microsoft.!

Video guide below.

Thanks!

Iain Smith
Lync 2013 – Enabling and Configuring Call Park

Hello

Wednesday’s 1 a day lunchtime blog post for this week

For this blog post its fairly straight forward, but I thought I would document it as the TechNet article I think doesn’t give you the full picture on what the config should be.

We will do a 80/20 split of the config with the main part of the setup being completed in the Lync Control panel and the remaining 20% part being completed in the Lync Management Shell.

Without further a do. lets start..

open up the Lync control panel and navigate to the Voice Routing selection on the left, then select the VoicePolicy area on the top panel.

12

Now Select your Voice Policy

13

Now select to enable call park, then select OK and then Commit your change

now select Voice Features from the left hand pane, then select call park from the top option

14

Now we will add the telephone number range,

select new, then give your call park a name, add the number range and also the pool to which associate the call park with. Now select OK

15

last thing we need to do is amend our dial plan as reteriving a parked call will ring between 1000 and 1005 WITHOUT a + at the start and therefore it will fail to connect. So what we need to do is add another dial plan rule to cater for the call park numbers.

Goto Voice Routing, select Dial Plan, then your dial plan. Now click new on the associated normalization rule.]

16

let now add the new rule for the call park numbers

17

DONT forget to test your rule and also move it up to the right order within the rule base.

thats it. set up. You can take the Call park a little bit further by running the powershell command Get-CSCpsConfiguration, instead of the Get you can do Set and change the amount of attempts to pickup the call, the amount of time the call will hold for before reverting back to the callee and also to allow music on hold. (if you wanted custom music on hold you would need to amend the CsClientPolicy path for music on hold)

Thats it for this lunchtimes blog posting

Regards

Iain Smith
Adding Custom Presence Status to the Lync 2013 Client

In this blog post I will run through the two ways you can add the custom Lync presence status to your company Lync users estate or to your own personal Lync 2013 client.

The way I see this is, if you are an administrator then using powershell and policies you can go to a good level of custom presence integration within your Lync environment. If you are an end user and you want to create your own custom presence status, then this can be done without the need of your IT team (The caveat around this is you need access to the registry on your machine and usually this requires admin credentials.)

Firstly we will look at the Administrator way of creating the custom presence within the Lync Environment

step 1

We need to create a custom Presence XML file this is the file Lync will read to get the unique new presence statuses

format needs to be the following

<?xml version=”1.0″?>
<customStates xmlns=”http://schemas.microsoft.com/09/2009/communicator/customStates“>
<customState ID=”1″ availability=”online”>
<activity LCID=”1033″>Working from Home</activity>
<activity LCID=”1044″> </activity>
<activity LCID=”1055″> </activity>
</customState>
<customState ID=”2″ availability=”busy”>
<activity LCID=”1033″>In a Lync Meeting</activity>
<activity LCID=”1036″> </activity>
</customState>
<customState ID=”3″ availability=”busy”>
<activity LCID=”1033″>Meeting with Client – Public Sector</activity>
<activity LCID=”1055″> </activity>
<activity LCID=”1036″> </activity>
</customState>
<customState ID=”4″ availability=”do-not-disturb”>
<activity LCID=”1033″>Interviewing</activity>
<activity LCID=”1036″> </activity>
</customState>
</customStates>

Now Save this a .XML format file. (Save it onto your local drive, then in time we will copy this to a file share or the root of your Lync 2013 server

In this post im going to copy the file to the Lync frontend in my lab. (NOTE: you need to copy it to a server/desktop which has webserver enabled and working.

for my lab the path is, https://lync2013.northernlync.co.uk/clientpresence/Northernlync_custompresence.xml

1

Once your added and tested the path and it returns the custom states in a IE page then you are good to continue. If you don’t get the custom states then you need to jump back into IIS and fix your Virtual directory folder path.

Step 2

Now we need to go into the Lync Management Shell on the Lync 2013 frontend.

At this point we can do one of two things. 1, we can add the custom presence to an existing client policy or 2, we are required to create a new Client Policy.

<to add a new client policy the PS command will be –

New-CsClientPolicy -Identity NorthernlyncCustomStates -CustomStateURL “https://lync2013.northernlync.co.uk/ClientPresence/NorthernLync_customstates.xml

Once ive ran the above you can see its created the policy

2

Step 3

We now need to assign the policy to a user.

again using powershell you need to grant the policy using the following command Grant-CsClientPolicy -Identity “<username>” -PolicyName <nameofcustompolicy>.

eg: Grant-CsClientPolicy -Identity “Iain Smith” -PolicyName NorthernlyncCustomStates.

3

Now get the user to log out of the Lync Client and relog back in. (don’t forget to Kill the lync.exe off before logging back in)

4

There you have it.. a Lync Client Policy based Custom Presence.

—————————————————————————————————

Now lets look at a way you can do it a an individual user of Lync. – I would go as far as saying this option would always a secondary option, and im just detailing it for this blog and would never suggest it to one of my customers.

STEP 1

Same again we start with the creation of the .XML file in the same format.. (this time I’m going to change the names of the states so that we can see the new ones are getting picked up)

<?xml version=”1.0″?>
-<customStates xmlns=”http://schemas.microsoft.com/09/2009/communicator/customStates“>
-<customState availability=”online” ID=”1″>
<activity LCID=”1033″>In the Lync Lab</activity>
</customState>-<customState availability=”busy” ID=”2″>
<activity LCID=”1033″>SuperBusy</activity>
</customState>-<customState availability=”busy” ID=”3″>
<activity LCID=”1033″>Meeting with Client – Lync Call</activity>
</customState>-<customState availability=”do-not-disturb” ID=”4″>
<activity LCID=”1033″>Blogging</activity>
</customState>
</customStates>

STEP 2

Save the .xml to a place on your own machine. ie: C: etc etc – for me im saving it to c:\Users\smitiai\Downloads on my local desktop machine which is running my lync 2013 client

STEP 3

We need to go into the registry now and add the paths into the folders for the Lync client startup process to hook into them.

goto start – regedit (might need Admin credentials at this point)

navigate to or Add HKEY_LOCAL_MACHINE\SOFTWARE\Policies\Microsoft\Office\15.0\Lync\EnableSIPHighSecurityMode

and set the dword = value 0

5

no navigate to OR add HKEY_LOCAL_MACHINE\SOFTWARE\Policies\Microsoft\Office\15.0\Lync\CustomStateURL

6

again log out of the Lync client, kill the process then log back in to pick up the new custom states

7

That’s it.

Thanks

Iain Smith
Installing Lync 2013 into a domain with multiple child domains

Good Afternoon All

This post relates to the installation of Lync 2013 into a domain where theres multiple child domains associated. The blog posting goes through the schema, forest, domain preparation steps as these are different when implementing into a child domain.
Following the ‘step 1’ preparation steps the remaining installation steps are the normal steps which you can find in one of my other blog posts.

Complete Lync 2013 Installation Guide including – Pre Reqs, Enterprise Edition Pool, SQL Mirroring and Witness, Archiving/Monitoring, Persistent Chat, Edge Setup and XMPP integration PART 1 of 6

In this lab scenario i will be preparation my child domain (named Child1) for Lync 2013, along with child1 i also have a overarching root domain and another child domain called child2. In the scenario in child2 i have Lync 2010 installed.
This scenario is more common than you might expect where a company might have merged but for one reason or another? maybe finincal the two companies although joined in name might operate in silos. So for clarity the below is my lab set up

Root domain is called rootnorthernlync.local
child1 is called child1.northernlync.local (Lync 2013)
child2 is called child2.northernlync.local (Lync 2010)

Its also worth noting that in this scenario users of Lync 2010 arent required to have access to the Lync 2013 deployment.By this i mean both child domains dont require the ability to share the user contacts in AD.

ok lets start by a root domain screen shot.

2013-05-11_18-24-03

This shows something of importance.. As you can see i already have the member groups within the root domain from my Lync 2010 deployment in the child2 child domain.

So the first question then? why are the member groups in the root domain and not in the child2 domain where Lync 2010 is installed.??

Simply put Lync shares the member groups across all domains therefore its an installation requirement for these to be prepared in the top level root of your domain and not the child. (further into this lab i will attempt to install the member groups into the child domain so that you can see the error relating to do this) PLUS how to properly install these member group attributes without issues.

Next step then is to login into a machine which is a member of the child1 domain so that i can start my Lync 2013 installation

2013-05-11_18-33-35

Its worth nothing i stupidly named my Lync2013 machine in the VM build child1. so as you can see i have child1 in the child1.rootnothernlync.local domain.

Also below is the AD member groups before the lync 2013 preparation steps. (this should be the same after the prepare steps as well)

2013-05-11_18-39-24

Now lets run in the Lync 2013 deployment wizard. (of course at this stage you need .net4.5 and Powershell 3.0 (Restart required) if you are installing into a windows2008r2 server link in my lab.

http://www.microsoft.com/en-gb/download/details.aspx?id=34595

http://www.microsoft.com/en-gb/download/details.aspx?id=30653

2013-05-11_18-46-56

Ok so next we are going to select Prepare Active Directory (Make sure you have the necessary rights to preform the preparation steps)

2013-05-11_18-48-32

select Run on the step 1, and then select next and the next prepare schema dialog option

***Dependant on how big your organisation is, the schema prep can take a far few minutes to complete.

2013-05-11_18-50-29

Once your replication has completed as per step2. then onto step 3

The below screenshot is the required prerequisites for step3.. Check the arrowed prereq?! At this point as you know our Lync 2013 machine is attached to the child1 domain and not the root domain as the prereq states. ALSO you might not have access to a machine on the root domain.. so what are you to do? see below

Firstly im going to just select run and leave the option for the local domain to show you the error message it throws. plus this will give you an idea on what you need to do next.

2013-05-11_18-56-38

See the error.?? not really any idea what the issue is do we? Hopefully the log file will tell us more.

2013-05-11_18-58-50

so to fix this is.. firstly if you have access to a machine on the root domain and you want to go through the pain of installing the Lync 2013 deployment wizard then you could run the preparation steps on that machine.

For this lab we are going to powershell the command into the root from our child1 domain.

Enable-CsAdForest [-GroupDomain <FQDN of the domain in which to create the universal groups>]

in our lab case this is the PS we will be running from the lync management shell

Enable-CsAdForest -GroupDomain rootnorthernlync.local

**Dont forget to run the management shell as adminsitrator

2013-05-11_19-06-01

2013-05-11_19-37-41

you will not get any confirmation that its completed with the -verbose on the end of your command.

Anyhow lets jump back to the deployment wizard now and see what the status now says?

2013-05-11_19-40-23

Nice…

So lets continue on with the wizard for step5.Note: this will just run without any special powershell command etc.

Once this complete, jump back the main wizard window.

2013-05-11_19-42-21

As you can see our preparation steps are now complete, and we can continue on with a Standard or Enterprise deployment.

Last step below is the screenshot of the root member groups now we have run in the 2013 prereqs.

2013-05-11_19-44-35

As you can see the new 2013 CS member groups are there..

Well thats it for this blog posting. If youve got to this stage and your continuing on to deploy Lync 2013, check out my other deployment guides. (part 1 is at the top of this blog posting)

I hope this blog post has helped some of you out there.

Regards

Iain Smith
Grant-OuPermissons Lync 2013. Powershell Script

Good Afternoon
Below is a simple script for grant the Ou-permission what are required when deploying Lync 2013 in a restricted or locked down domain/AD.

The below link reference 6 of the attributes that have to have the permissions set. Like most Clients there is never just one container level, and many clients AD drills down through many container levels. Because of this setting the grant-oupermissions would be impossible to do manually, therefore below is a little noddy script which would read an csv. file and upload the contents based on the attributes.

So to confirm to run this script you need a .csv file format of all your OU’s and subOu’s (note: the firstline is the header information)

eg:

Object,DN
User,”OU=Leeds,OU=Northernlync_Users,DC=northernlync,DC=local”
Contact,”OU=Leeds,OU=Northernlync_Users,DC=northernlync,DC=local”
AppContact,”OU=Leeds,OU=Northernlync_Users,DC=northernlync,DC=local”
INetOrgPerson,”OU=Leeds,OU=Northernlync_Users,DC=northernlync,DC=local”
Device,”OU=Leeds,OU=Northernlync_Users,DC=northernlync,DC=local”
Computer,”OU=Leeds,OU=Northernlync_Users,DC=northernlync,DC=local”

you need to have the rows for all the object attributes required in the grant-oupermission set

User, Contact, AppContact,Computer, InetOrgPerson, Device

Now copying the below powershell into notepad, then saving it as <name.ps1>, opening it up from the lync management shell you will be presented with a option to specify the <name.csv> file. (you need to save the .csv file into the same place as you’ve save the .ps1 file.)

<<<

param( [string] $importfile = $(Read-Host -prompt `

    “Please enter the csv file name”))

$NorthernLyncArry = Import-Csv $importfile

$transcriptname = “GrantOUPermissions” + (Get-Date `

    -Format s).Replace(“:”,”-“) +”.txt”

Start-Transcript $transcriptname

foreach ($NorthernLyncArry in $NorthernLyncArry)     { Grant-CsOuPermission –ObjectType “$NorthernLyncArry.object” –ou $NorthernLyncArry.ou –Domain “northernlync.local” -Verbose             }

Stop-Transcript

>>>

Add the .csv file name to the prompt and sit back and watch the updating commence.

Simple.!

Regards

Iain Smith
 

Complete Lync 2013 Installation Guide including – Persistent Chat Installation and configuration PART 4 of 6

Hello All

Part 4 of the 6 part series on how to install and configure a fully functional Lync 2013 enterprise edition deployment.

Please check out the other parts at the links below

Part 1 Complete Lync 2013 Installation Guide including – Pre Reqs, Enterprise Edition Pool, SQL Mirroring and Witness, Archiving/Monitoring, Persistent Chat, Edge Setup and XMPP integration PART 1 of 6

Part 2 Complete Lync 2013 Installation Guide including – Pre Reqs, Enterprise Edition Pool, SQL Mirroring and Witness, Archiving/Monitoring, Persistent Chat, Edge Setup and XMPP integration PART 2 of 6

Part 3 Complete Lync 2013 Installation Guide including – Web Access WAC, Archiving and Monitoring Server and Reports PART 3 of 6

Part 4 – Installation and configuration of Persistent Chat

Thanks for checking back everyone. I hope you find the below useful.!

So to recap we have built our servers, we’ve add our topology information (Part1), we’ve installed our Enterprise edition servers with SQL Mirroring (Part2), we’ve added the WAC server for Powerpouit presentation as part of conferencing and now its time to configure and install persistent chat.

Starting with Adding the Chat server to the topology.

Open up your topology. (for me that means jumping back onto one of the front-end servers as i don’t add the admin tools to all my Lync servers.

Lync2013fe01 is the server of choice.

NewImage

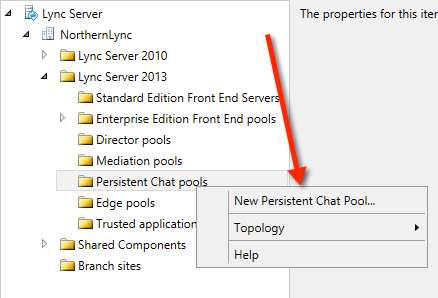
Navigate and open your Lync 2013 Pool, and right click on the persistent chat option to select to add a new chat server.

NewImage

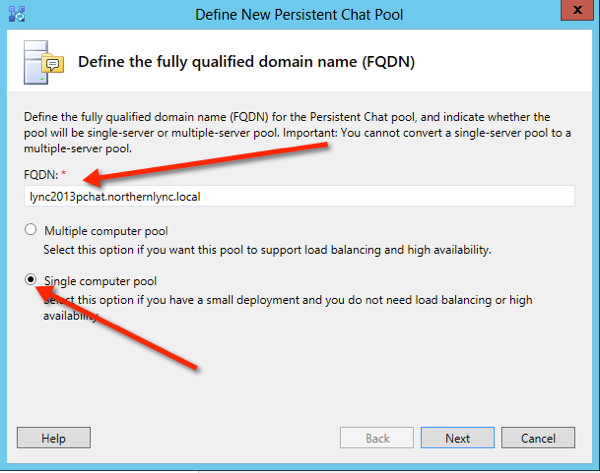
For my lab and guide I’m not going to have the Chat servers as a pooled topology. Im selecting it as a single server.

NewImage

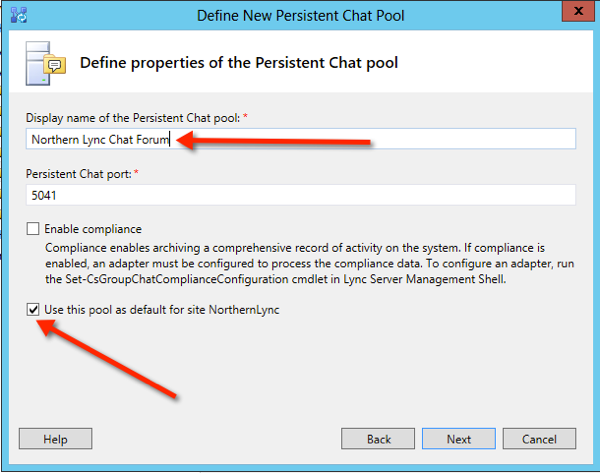
The next page you need to give your Chat Pool a name which will be seen by all chat users.

If your company is governed by compliance you can also add this into your achieving topology if you have that option enabled for Lync 2013

Also you have the option to make the pool the default. (if you are creating it as a passive pool then don’t tick this option)

NewImage

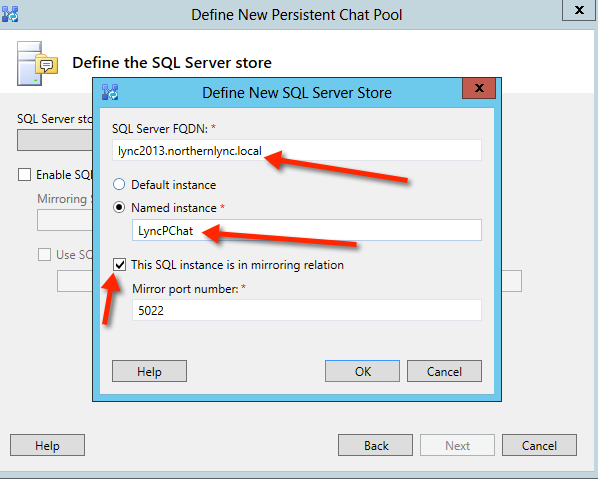
The next step is to select your SQL Server and instance.

For our guide I’m using a separate instance for all my pools, but I’m using my Mirrored SQL Server to home the PChat Services

LyncCore – Lync 2013 Frontends

LyncArcMon – Archiving and Monitoring

LyncPChat – Persistent Chat

NewImage

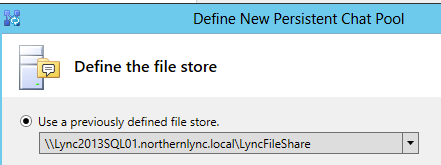
Now select your fileShare. Again I’m going to collocate the Chat files into my global Lync file share called LyncFileShare

NewImage

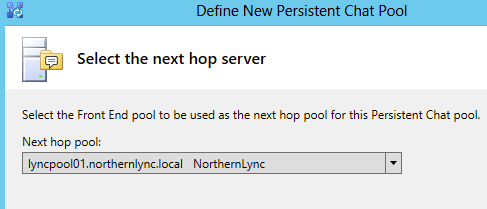
Add your next hop pool. By default it will select your main Pool

NewImage

Select Finish.. then publish your revised topology

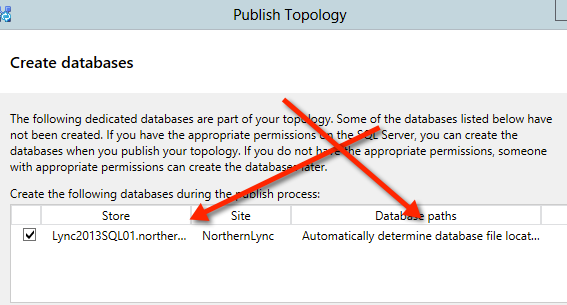
When select next through the publish dialog’s you will prompted to change if required the SQL storage as part of the Pchat database installation.

NewImage

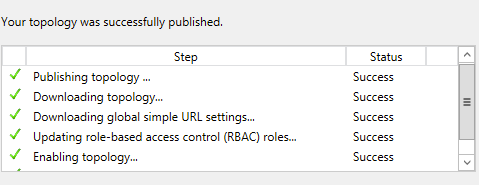
Make sure your topology publishes without errors. if you do get errors or warnings ensure you fixed them republish until your fully successful

NewImage

Ok we are now finished with the topology element, so now its time to move onto the LyncChat server installation

Persistent Chat Server Pre Req’s (Roles and Features)

– Windows Identity Foundation (This is part of the Windows 2012 Features function)

NewImage

Now install the deployment wizard. (the lync 2013 setup.exe)

you will already see a green tick in the prepare activity directory

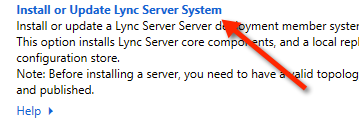
now select the ‘install and update Lync Server system’

NewImage

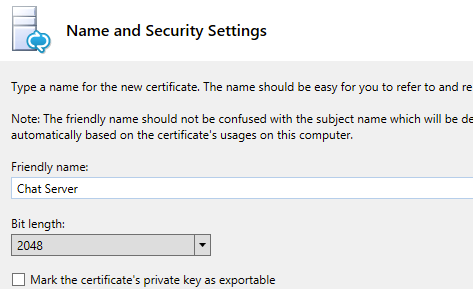
Run through the steps again starting at 1,2,3 (you do require a certificate for the chat server, so use your CA)

NewImage

Once you’ve generated and assigned your certificate from your CA to the chat server. it time to start the services

NewImage

Run Step 4 and start your services

NewImage

—————————————————————————————————————————————————————————————————————————————————————-

Persistent Chat – Chat Configuration

Now go back to your lync control panel and from the left hand pane select > persistent chat. At this point you need to have an idea of the type of chat categories you are going to enable.

For the purpose of the lab demo or chat category will be about and sudo issue relating to ‘Lync 2013 enabling of Users’

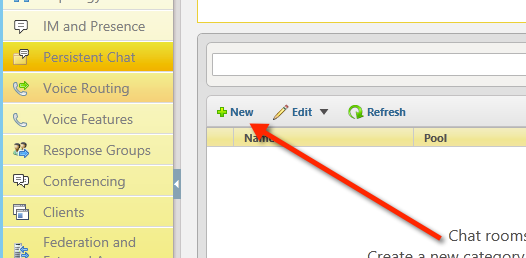
Once your in the chat profile in the control panel, select New

NewImage

Select your Chat Pool, and next

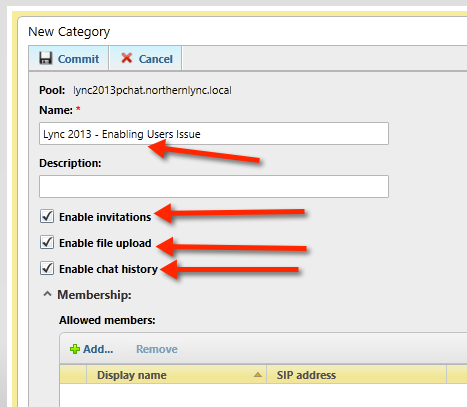
Add the name of your category. In our case Lync 2013 – Enabling Users Issue

Im also going to select to invite people to the chat forum, and also enable upload, enable chat history.

NewImage

Then I’m going to add my members. Im only going to add my own Lync demo user called Iain Smith
Click add on allowed members and search then add your member/s.
Also I’m going to add user iain smith, as a creator who can add rooms to my category. The commit your actions

NewImage

you then need to tab to the Persistent chat policy and ensure chat is enable as the chat feature

NewImage

Thats it from the Lync client your user should be able now to select the chat option and add new rooms to the chat forum and also add other users to the chat forum.

Thanks again for looking

Regards

Iain Smith